5分钟了解MCP如何使用(Model Context Protocol)
[toc] ## MCP是什么 > MCP is an open protocol that standardizes how applications provide context to LLMs. Think of MCP like a USB-C port for AI applications. Just as USB-C provides a standardized way to connect your devices to various peripherals and accessories, MCP provides a standardized way to connect AI models to different data sources and tools. > from offical site
MCP 是一种开放协议,由Anthropic在24年11月提出. 它标准化了应用程序向大型语言模型提供上下文的方式。将 MCP 想象成 AI 应用程序的 USB-C 端口。就像 USB-C 为您的设备提供了一种标准化的方式来连接各种外围设备和配件一样,MCP 为 AI 模型提供了一种标准化的方式来连接不同的数据源和工具。
MCP实际上就是为LLM的function call 套用了一层接口(协议), 使得用户可以在与模型的交互中按照这套协议调用自己的本地工具(服务).这里要强调本地, 是因为实际上MCP机制全部都是在本地发生的.这样的设计可以有效地保护用户的隐私, 用户在调用function时, 不需要把apikey提供给LLM供应商.
MCP架构
在大模型应用里,建立多个MCP Client. 每个实例负责访问对应的MCP Server.MCP Server负责真实的function call功能交互, 如(访问数据库, API等)
1 | flowchart LR |
- MCP 主机:像 Claude Desktop、IDE 或 AI 工具这样的程序,它们希望通过 MCP 访问数据
- MCP 客户端:与服务器保持 1:1 连接的协议客户端
- MCP 服务器:轻量级程序,每个程序通过标准化的模型上下文协议暴露特定的功能
- 本地数据源:MCP 服务器可以安全访问的计算机文件、数据库和服务
- 远程服务:通过互联网(例如,通过 API)可用的外部系统,MCP 服务器可以连接到
MCP交互过程
1 | sequenceDiagram |
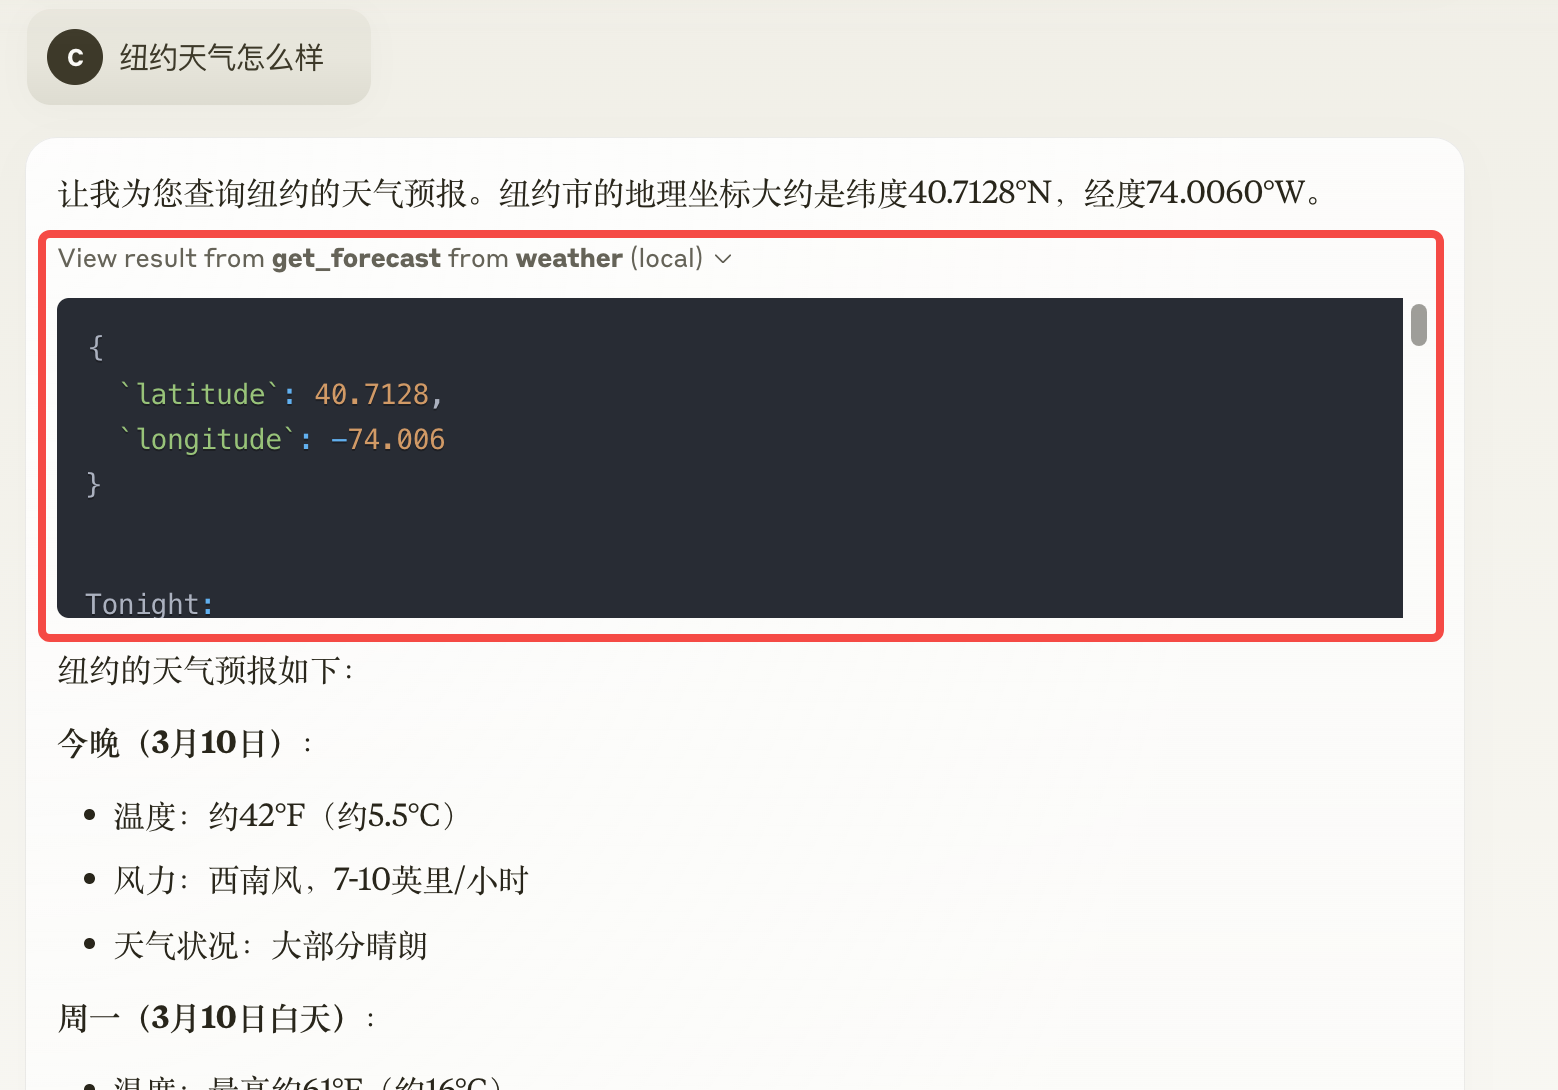
用MCP的机制查询天气
现在我们搭建一个请求天气预报的MCP Server的例子, 看看具体流程是什么样子. 详细的内容参考官网例子.
1. 安装环境
我这里使用的是python sdk, 需要安装uv来启动server
2. 开发weather服务
- 绑定服务名
1
2
3
4
5
6from typing import Any
import httpx
from mcp.server.fastmcp import FastMCP
# Initialize FastMCP server
mcp = FastMCP("weather")
- 绑定服务名
- 实际api请求与输出格式化
1
2
3
4
5
6
7
8
9
10
11
12
13
14
15
16
17
18
19
20
21
22
23
24async def make_nws_request(url: str) -> dict[str, Any] | None:
"""Make a request to the NWS API with proper error handling."""
headers = {
"User-Agent": USER_AGENT,
"Accept": "application/geo+json"
}
async with httpx.AsyncClient() as client:
try:
response = await client.get(url, headers=headers, timeout=30.0)
response.raise_for_status()
return response.json()
except Exception:
return None
def format_alert(feature: dict) -> str:
"""Format an alert feature into a readable string."""
props = feature["properties"]
return f"""
Event: {props.get('event', 'Unknown')}
Area: {props.get('areaDesc', 'Unknown')}
Severity: {props.get('severity', 'Unknown')}
Description: {props.get('description', 'No description available')}
Instructions: {props.get('instruction', 'No specific instructions provided')}
"""
- 实际api请求与输出格式化
- 接口开发
1
2
3
4
5
6
7
8
9
10
11
12
13
14
15
16
17
18
19
20
21
22
23
24
25
26
27
28
29
30
31
32
33
34
35
36
37
38
39
40
41
42
43
44
45
46
47
48
49
50
51
52
53
54
async def get_alerts(state: str) -> str:
"""Get weather alerts for a US state.
Args:
state: Two-letter US state code (e.g. CA, NY)
"""
url = f"{NWS_API_BASE}/alerts/active/area/{state}"
data = await make_nws_request(url)
if not data or "features" not in data:
return "Unable to fetch alerts or no alerts found."
if not data["features"]:
return "No active alerts for this state."
alerts = [format_alert(feature) for feature in data["features"]]
return "\n---\n".join(alerts)
async def get_forecast(latitude: float, longitude: float) -> str:
"""Get weather forecast for a location.
Args:
latitude: Latitude of the location
longitude: Longitude of the location
"""
# First get the forecast grid endpoint
points_url = f"{NWS_API_BASE}/points/{latitude},{longitude}"
points_data = await make_nws_request(points_url)
if not points_data:
return "Unable to fetch forecast data for this location."
# Get the forecast URL from the points response
forecast_url = points_data["properties"]["forecast"]
forecast_data = await make_nws_request(forecast_url)
if not forecast_data:
return "Unable to fetch detailed forecast."
# Format the periods into a readable forecast
periods = forecast_data["properties"]["periods"]
forecasts = []
for period in periods[:5]: # Only show next 5 periods
forecast = f"""
{period['name']}:
Temperature: {period['temperature']}°{period['temperatureUnit']}
Wind: {period['windSpeed']} {period['windDirection']}
Forecast: {period['detailedForecast']}
"""
forecasts.append(forecast)
return "\n---\n".join(forecasts)
- 接口开发
- main 到这里MCP Server就开发好了.
1
2
3
if __name__ == "__main__":
# Initialize and run the server
mcp.run(transport='stdio')
- main
3. 修改配置
这里以Claude Desktop为例. 实际上用MCP的app有很多(如, ClaudeDesktop,
Cursor, ...) 1. 打开Claude设置Settings 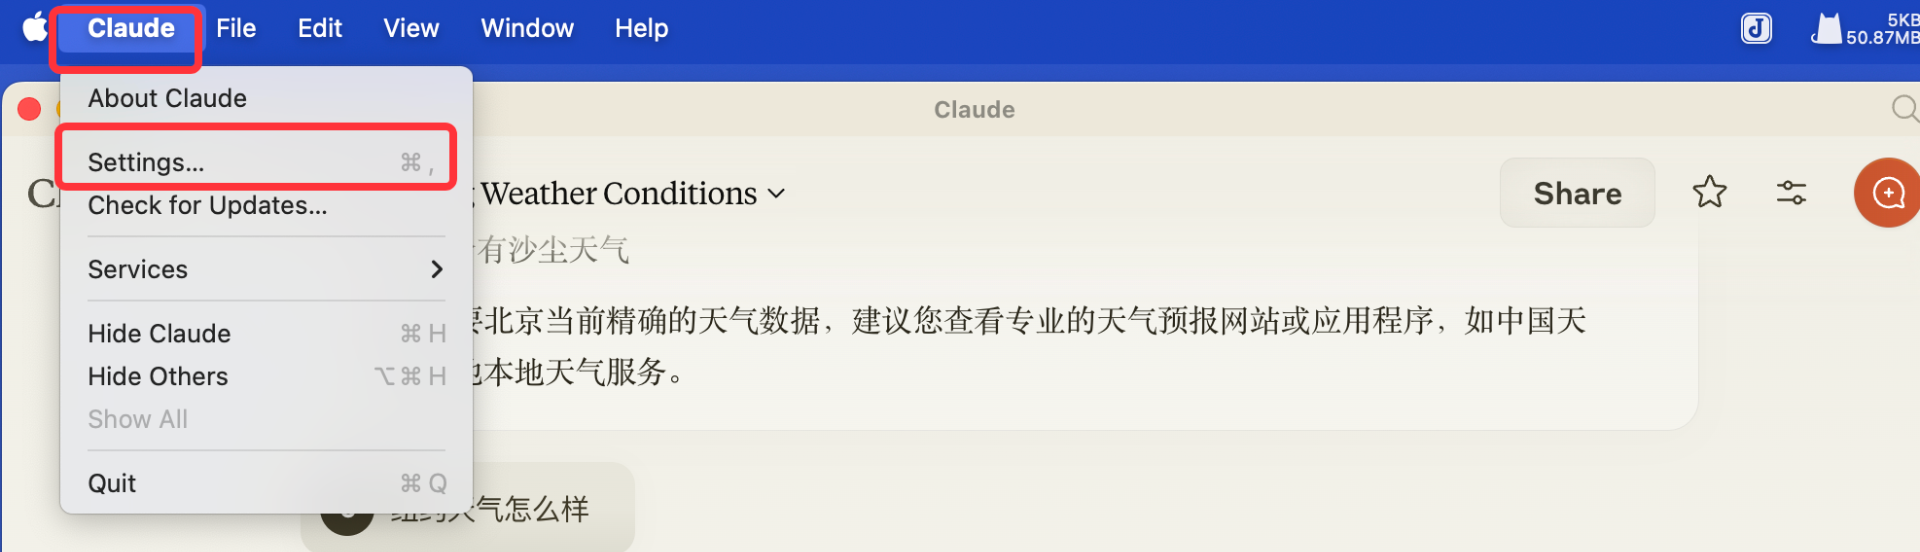 2. 选择Developer的设置
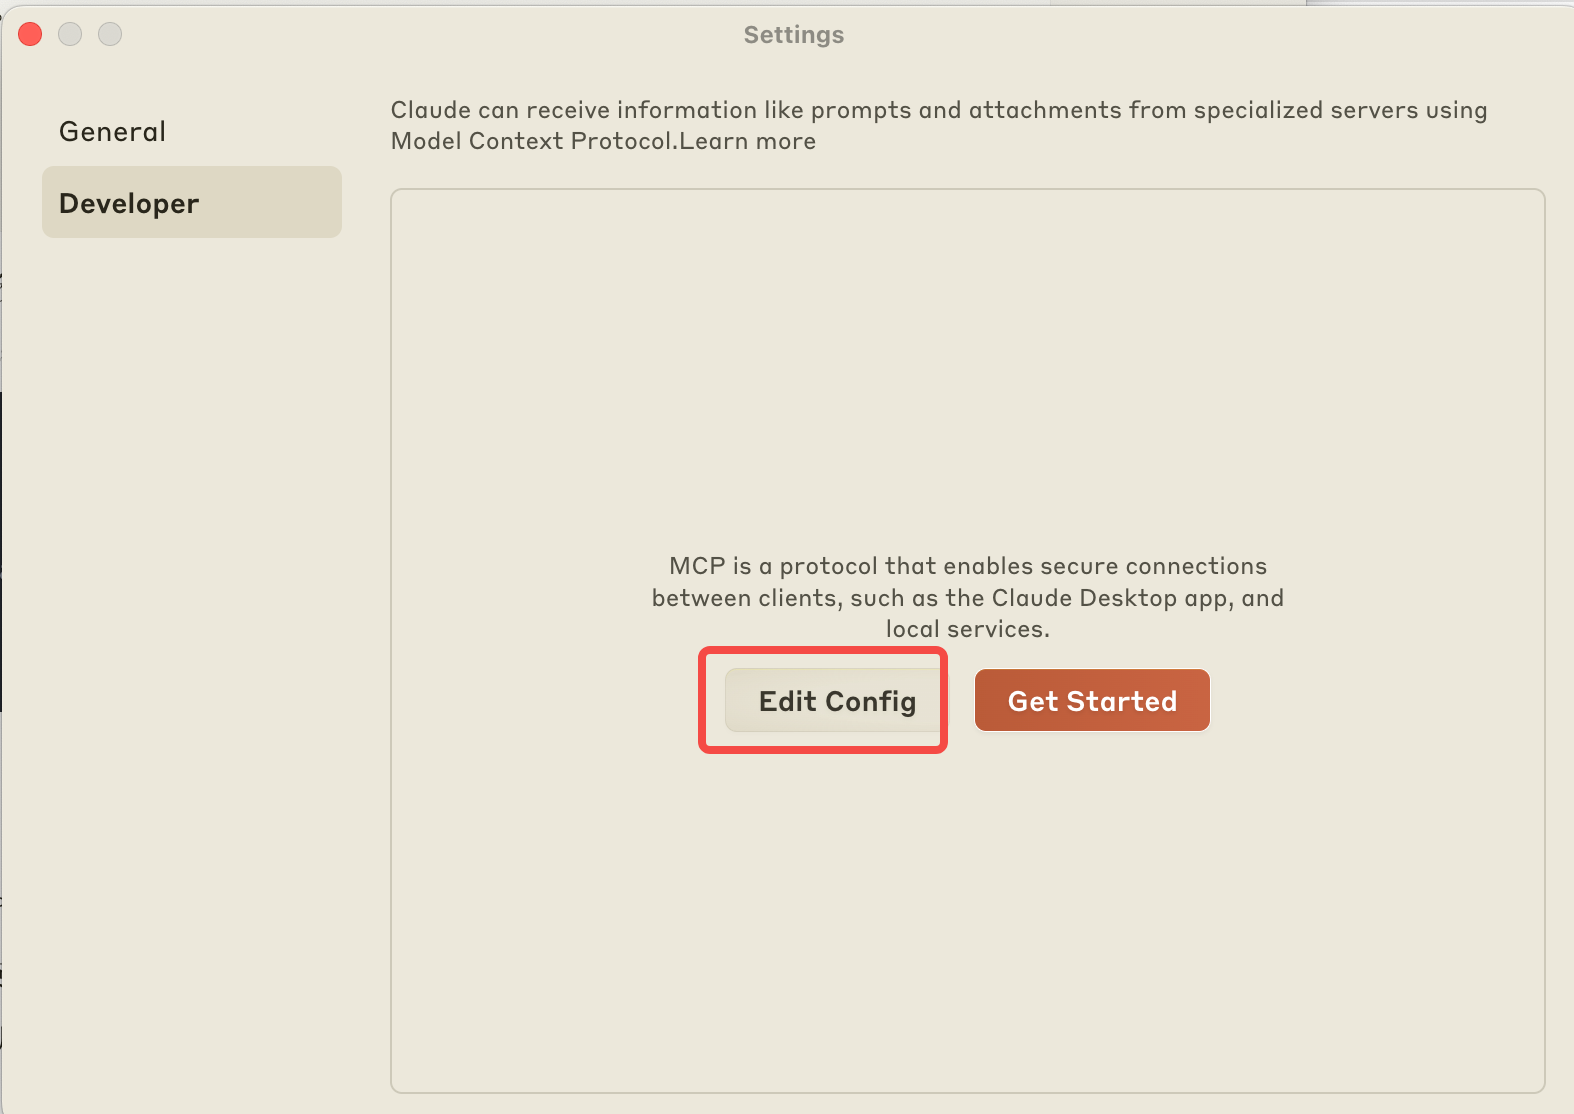
 3. 这是一个json文件,
加入MCP Server的启动配置
3. 这是一个json文件,
加入MCP Server的启动配置 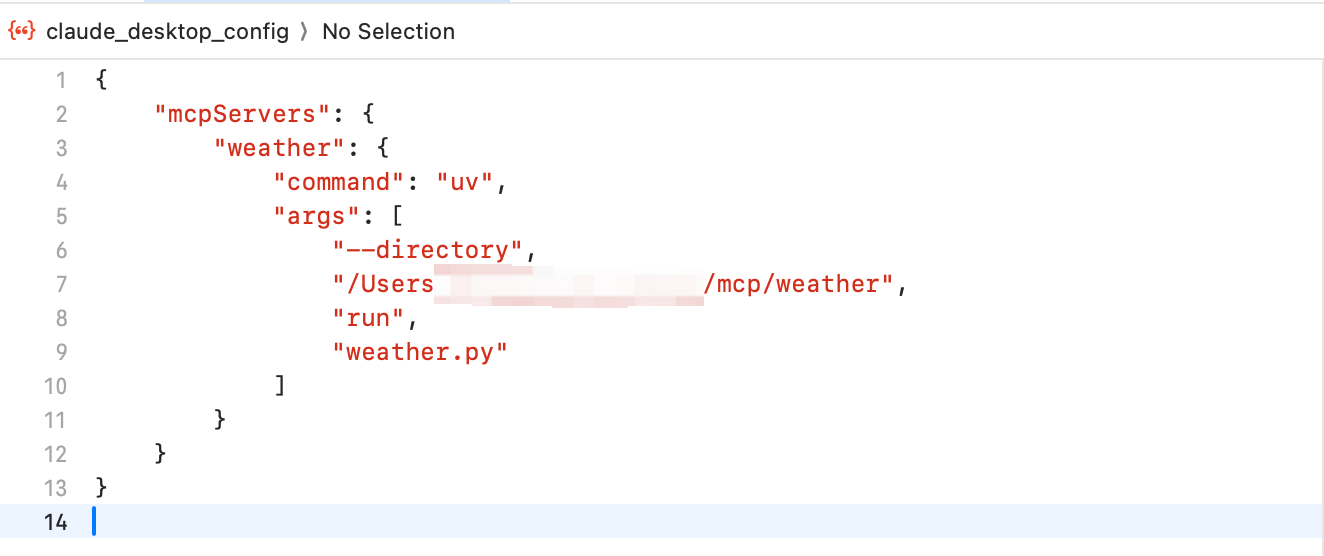 ### 4. 重启Claude Desktop
重启Claude Desktop, 然后就可以小锤子选项了.
### 4. 重启Claude Desktop
重启Claude Desktop, 然后就可以小锤子选项了. 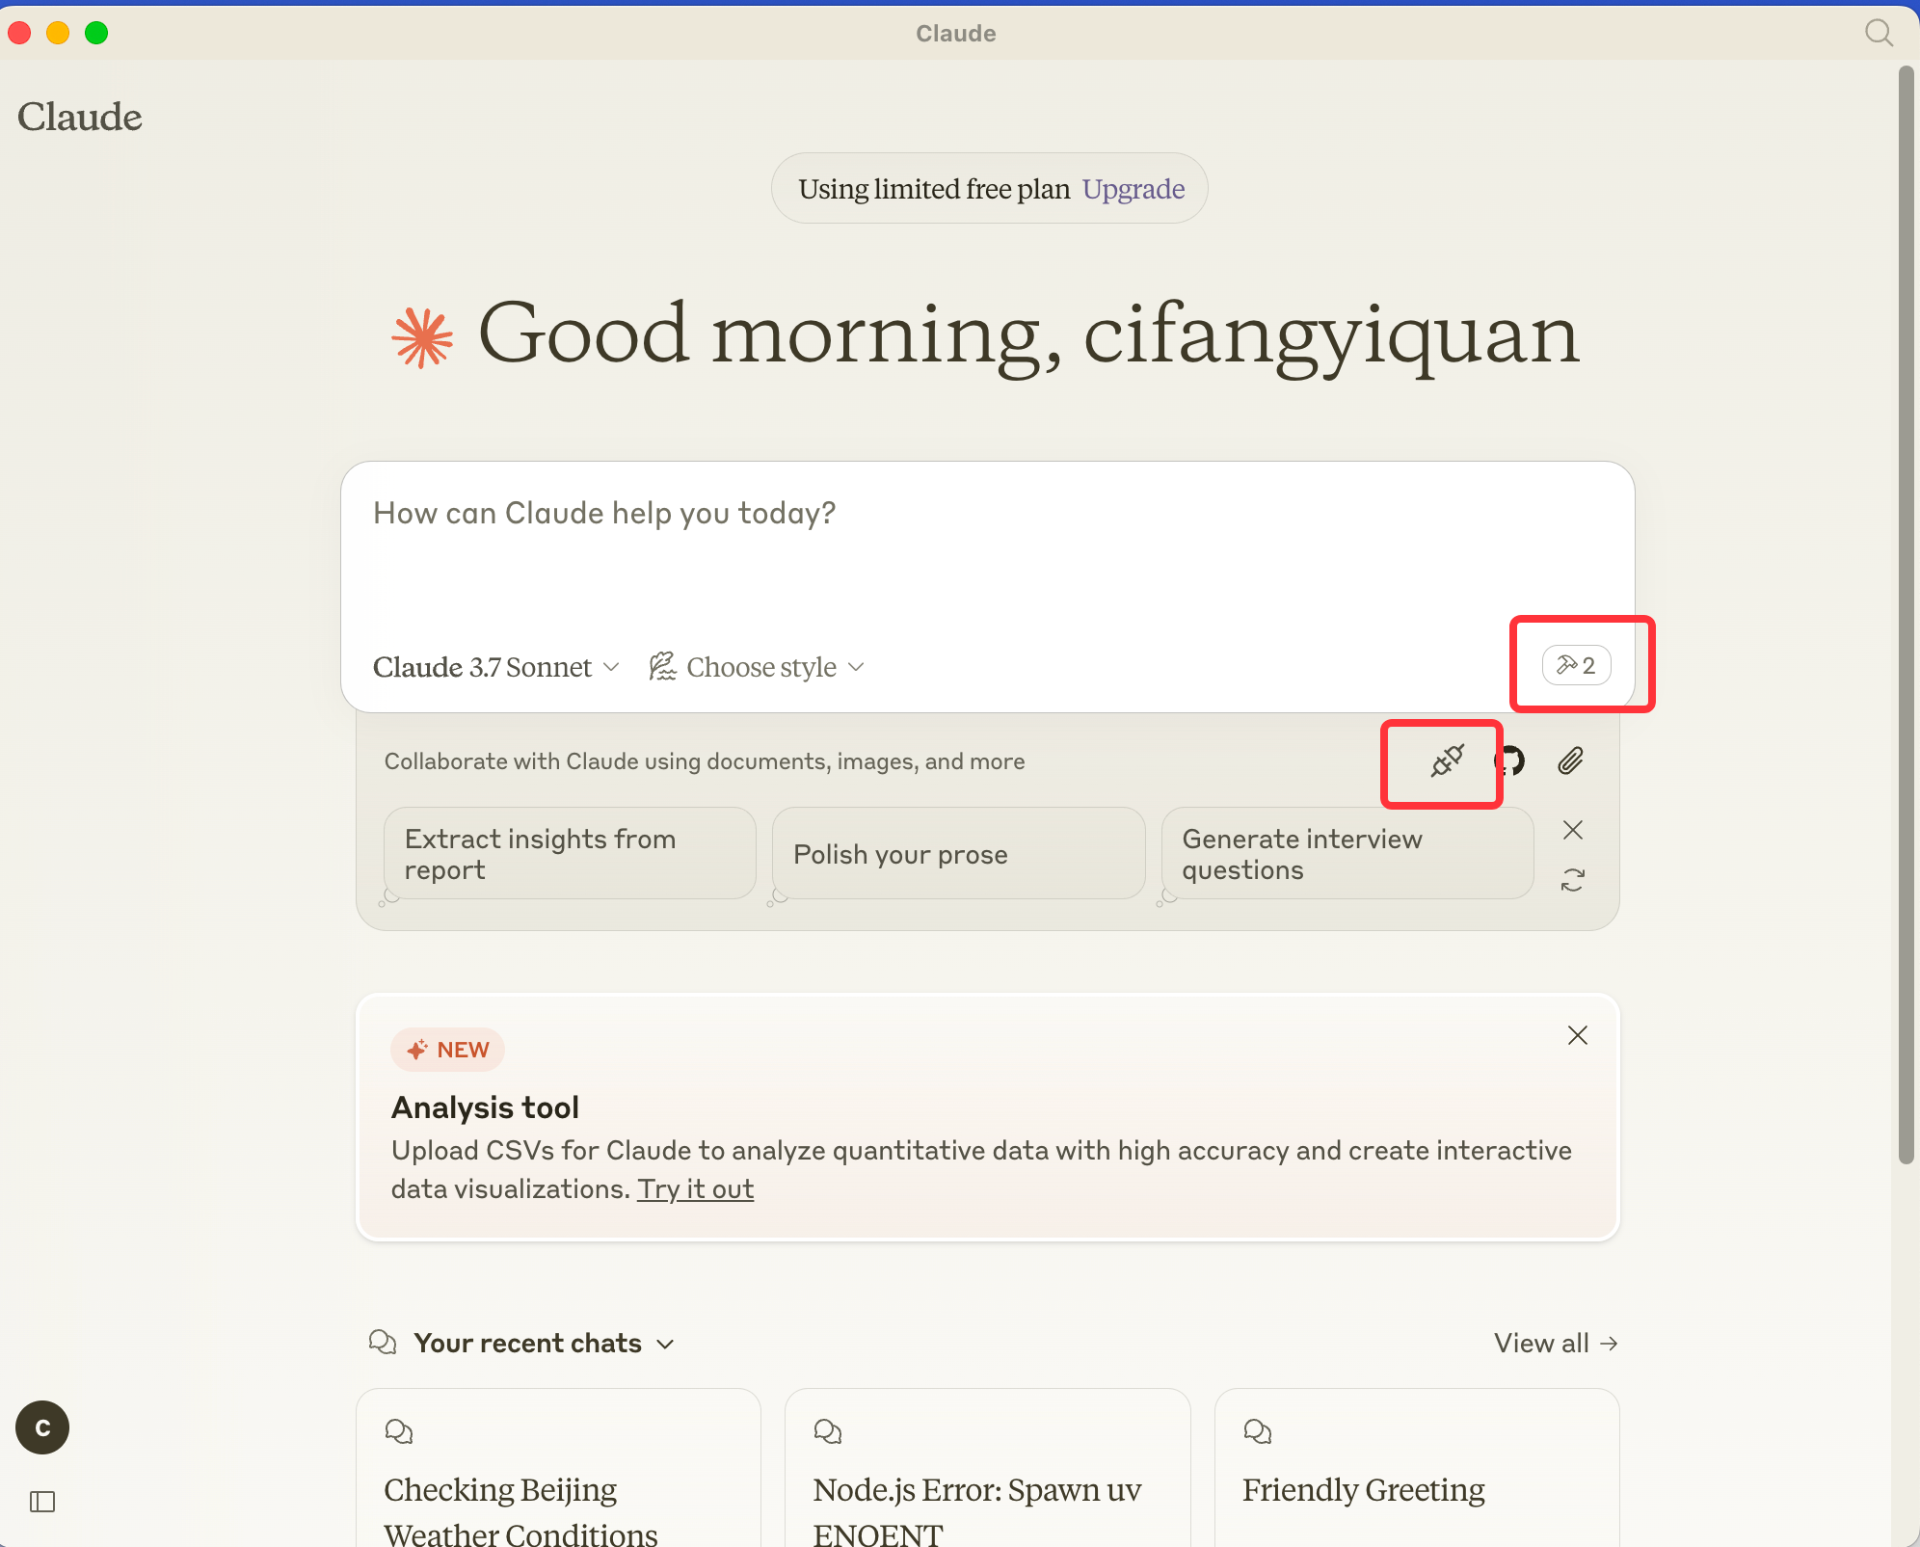
5. MCP 工具调用
对比其他机制
这里对比一下模型版Chatglm的工具调用.
| MCP | Chatglm | |
|---|---|---|
| 初始化 | app init MCP client | tool register注册 |
| 调用方式 | MCP client-server调用 | toolCall调用 |
| 架构 | Client-server 有状态, 可以保持连接 | Function call 无状态, 单次调用 |
总结
总体来说, 就是MCP进行一层tool function call的完整封装. 相对于其他智能对话产品, MCP提供了用户一种自定义function call的解决方案. 由于是在本地调用api, 保障了用户的隐私(apikey). 但MCP主要还是面向于开发者用户. 需要用户自行搭建MCP Server服务以及后续链路. 对于一般用户的成本还是略高.
引用
- https://modelcontextprotocol.io/
- https://github.com/modelcontextprotocol
- https://onevcat.com/2025/02/mcp/
- https://github.com/THUDM/ChatGLM3/tree/main/tools_using_demo
- https://open.bigmodel.cn/dev/howuse/functioncall